Spring Security OAuth 2 Tutorial - 6 : Microservices Sample Project Setup
In the previous articles, we have learned about various OAuth 2.0 / OpenID Connect flows using web browser, cURL and Postman. Now it’s time to put what we have learned into practice. What better way to do that than to build a sample project?
While implementing OAuth 2.0 / OpenID Connect based security using a Security framework like Spring Security, many activities are performed by the framework under the hood. It is important to understand what is happening under the hood so that we can use the framework effectively.
In this article, I will briefly introduce you to the sample microservices based project that we will be working on for this Spring Security OAuth 2 Tutorial series.
Sample Spring Boot Microservices Project
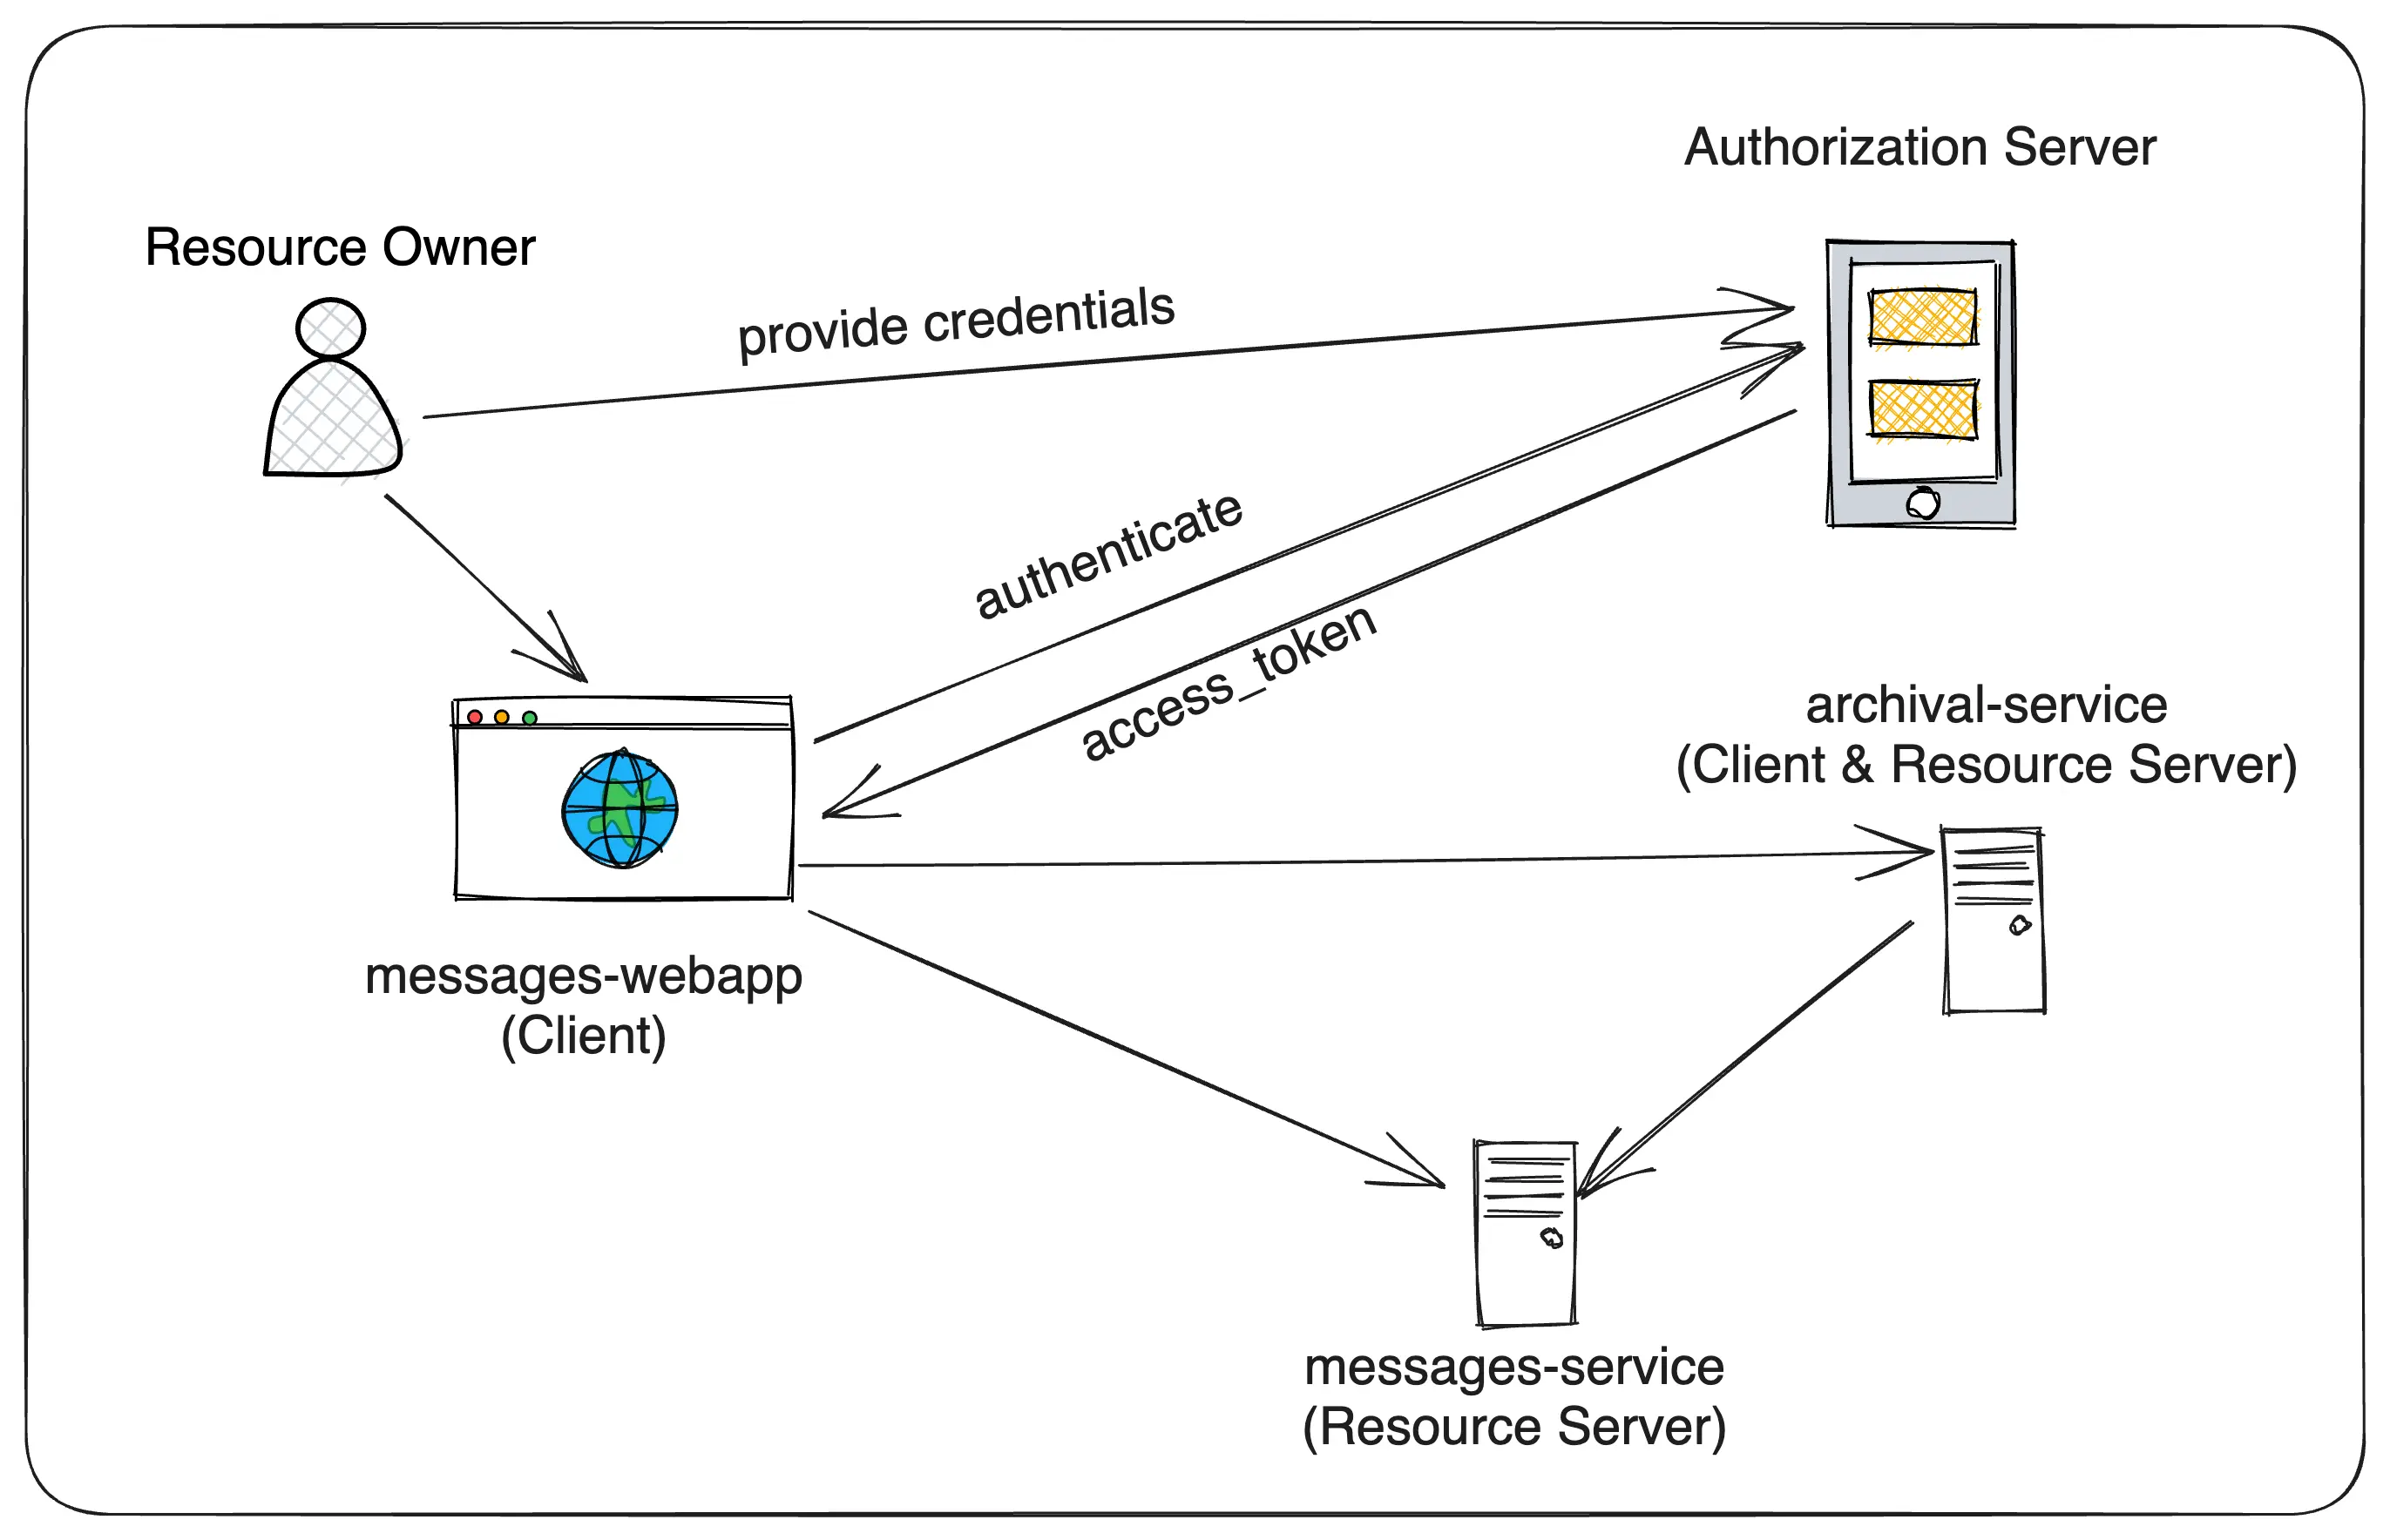
We are going to build a sample microservices project that has the following components:
- Authorization Server - This is the OAuth 2.0 Authorization Server that will issue access tokens to the clients. We will use Keycloak as the Authorization Server.
- messages-webapp - A Spring MVC based Client application that the end user will be using.
- messages-service - A Spring Boot REST API (Resource Server) that manages the user data (messages) and will be used by the messages-webapp application.
- archival-service - A Spring Boot application that handles archival of the messages at regular intervals using a scheduled job. It also exposes an API endpoint to trigger the archival process. This service will play the roles of both a Resource Server and a Client.
Let’s get into what functionality each of these components provides.
messages-webapp (Client)
This is a Spring Boot web application that uses Spring MVC and Thymeleaf to render the UI. This application will be protected by the Authorization Server (Keycloak) and will be using the Authorization Code Flow to authenticate the user and obtain the access token.
- Anyone (unauthorized users also) can view the list of messages.
- Any authenticated user can post a new message.
- Any authenticated user with ADMIN role can trigger the message archival process.
messages-service (Resource Server)
This is a Spring Boot REST API that manages the user data (messages) and will be used by the messages-webapp application. This is a Resource Server and exposes the following API endpoints:
- GET /api/messages - Returns the list of messages. Publicly accessible, no authentication required.
- POST /api/messages - Creates a new message. Any authenticated user can call this API endpoint.
- POST /api/messages/archive - Archives the messages older than N days. Only authenticated users with either ADMIN or ADMIN_JOB roles can call this API endpoint.
archival-service (Resource Server and Client)
This is a Spring Boot service that handles archival of the messages at regular intervals using a scheduled job. This service exposes an API endpoint to trigger the archival process only by ADMIN users. This application will be protected by the Authorization Server (Keycloak) and will be using the Client Credentials Flow to obtain the access token to invoke POST /api/messages/archive API endpoint of messages-service.
This service exposes the following API endpoint:
- POST /api/messages/archive - Internally delegates the archival process to messages-service. Only authenticated users with ADMIN role can call this API.
Why not messages-webapp directly call messages-service POST /api/messages/archive endpoint?:
The reason is, I would like to demonstrate a scenario where a service acts as both a Resource Server and a Client. The archival-service is a Resource Server exposing the POST /api/messages/archive API endpoint and also a Client for the messages-service.
Keycloak Setup
In the previous articles, we have learned how to setup Keycloak and create a realm, client and users. We will be using the similar Keycloak setup for the service configurations.
Exporting and Importing Keycloak Realm Configuration
If, for any reason, the keycloak docker container is deleted, then we need to again create the realm, client and users manually. We can use Keycloak’s export and import feature to export the realm configuration and import it back when needed.
Once the keycloak instance is up and running, we can create the realm, clients and users and then use the following steps to export the realm configuration.
$ docker ps
# copy the keycloak container id

# ssh into keycloak container
$ docker exec -it <container-id> bash

# export the realm configuration along with users info
$ /opt/keycloak/bin/kc.sh export --dir /opt/keycloak/data/import --realm sivalabs --users realm_file

# exit from the container
$ exit

# copy the exported realm configuration to local machine
$ docker cp <container-id>:/opt/keycloak/data/import/sivalabs-realm.json ~/Downloads/sivalabs-realm.json
Once you have the exported realm configuration file, copy it into the realm-config folder of the sample project. Then you can use it to automatically import it using docker-compose as follows:
version: '3.8'
name: spring-security-oauth2-microservices-demo
services:
  keycloak:
    image: quay.io/keycloak/keycloak:22.0.3
    command: ['start-dev --import-realm']
    volumes:
      - ./realm-config:/opt/keycloak/data/import
    container_name: keycloak
    hostname: keycloak
    environment:
      - KEYCLOAK_ADMIN=admin
      - KEYCLOAK_ADMIN_PASSWORD=admin1234
    ports:
      - "9191:8080"
Don’t worry if anything is not clear at this point, we will be exploring the sample project in detail in the upcoming articles.
Conclusion
In this article, we have explored the sample microservices project that we will be working on for this Spring Security OAuth 2 Tutorial series. In the next article, we will work on setting up Keycloak, creating the messages-webapp application and securing it in detail.
Related content
- Spring Security OAuth 2 Tutorial - 10 : Service to Service Communication using Client Credentials Flow
- Spring Security OAuth 2 Tutorial - 9 : Invoking Secured Resource Server APIs from Client Application
- Spring Security OAuth 2 Tutorial - 8 : Securing Resource Server
- Spring Security OAuth 2 Tutorial - 7 : Securing Spring MVC Client Application
- Spring Security OAuth 2 Tutorial - 5 : Implicit & Resource Owner Password Credentials Flows