Spring Security OAuth 2 Tutorial - 2 : Authorization Code Flow
In the Part 1: Getting familiar with OAuth 2 concepts, we learned how to set up Keycloak, created a realm, a client with Standard flow enabled and a user. In this Part 2, you will learn how to authenticate a user using Authorization Code Flow.
First of all, let’s clear up the confusion between Authorization Code Grant Type vs Authorization Code Flow.
As I mentioned earlier, OAuth 2.0 spec concern about only Authorization and OpenID Connect spec is added as a layer on top of OAuth 2.0 to handle Authentication.
The Authorization Code Grant Type is OAuth 2.0 terminology, whereas Authorization Code Flow is OpenID Connect terminology. They both work in the same way and the difference is in the scope. The difference will become clear while we explore Authorization Code Flow with examples later in this article.
To quickly recap, we have the following details of Client and User that we have created in the previous part.
- Client id: messages-webapp
- Client secret: qVcg0foCUNyYbgF0Sg52zeIhLYyOwXpQ
- Username: siva
- Password: siva1234
OAuth 2.0 High level Architecture
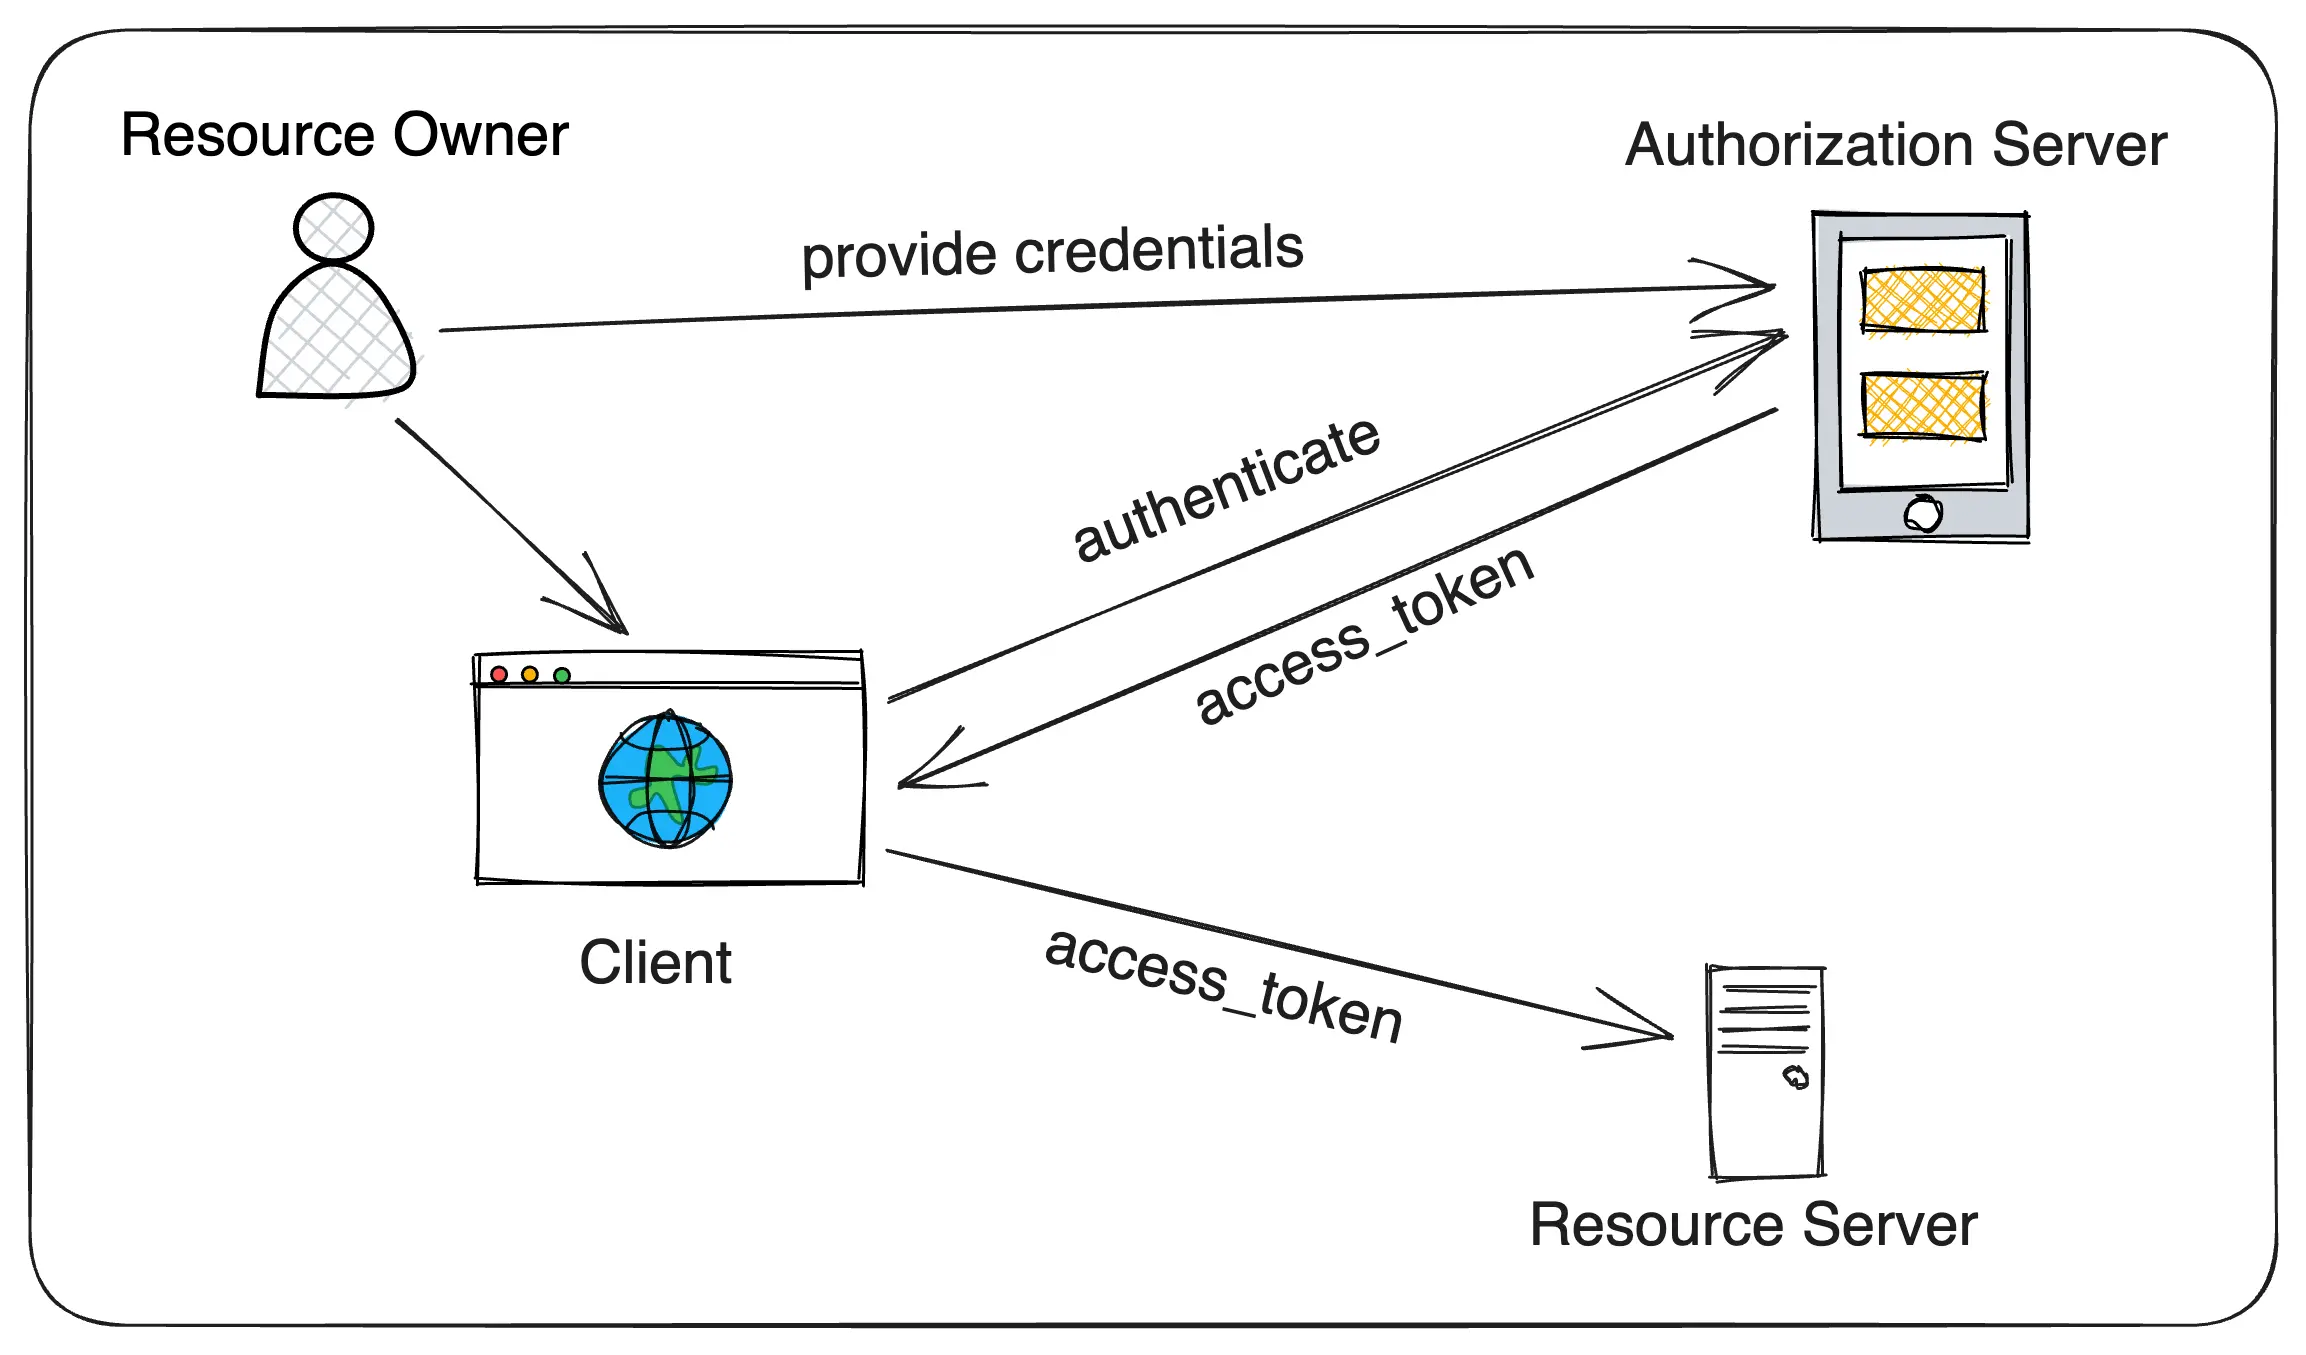
Here is a high-level Architecture diagram of an OAuth 2.0 based system.

- The Resource Owner (end user) wants to his/her data stored on the Resource Server using the Client application.
- The Resource Server data is protected, and you need access_token to be able to access the data.
- The Client application offloaded the responsibility of managing the users, issuing the access_tokens, validating them to the Authorization Server.
- When you (Resource Owner) try to access a protected resource on the Client application, you will be redirected to Authorization Server where you need to authenticate yourself by providing the user credentials.
- If the authentication is successful, the Authorization Server issues an access_token to the Client.
- Then the Client can access the protected user’s data using the access_token.
This is a very high-level flow of how an end-user can access their protected resources using OAuth 2.0 based security.
Now if we map these various components in our current Keycloak setup, it will look like this:
- Authorization Server: Keycloak
- Client: messages-webapp (which is not yet created)
- Resource Server: messages-service (which is not yet created)
- Resource Owner: user(siva)
As I mentioned in the previous part, there are different ways such as Authorization Code Flow, Client Credentials Flow, Implicit Flow, Resource Owner Password Flow to get access_token.
In this part, we are going to focus on acquiring access_token using Authorization Code Flow.
Before getting into it, first let’s see how to get some important URLs that we will use going forward.
Login into Keycloak Admin Console, select sivalabs realm, click on Realm settings. You can see the Endpoints section and a link to OpenID Endpoint Configuration. If you click on that link, you will see the following JSON response:
{
    "issuer": "http://localhost:9191/realms/sivalabs",
    "authorization_endpoint": "http://localhost:9191/realms/sivalabs/protocol/openid-connect/auth",
    "token_endpoint": "http://localhost:9191/realms/sivalabs/protocol/openid-connect/token",
    "introspection_endpoint": "http://localhost:9191/realms/sivalabs/protocol/openid-connect/token/introspect",
    "userinfo_endpoint": "http://localhost:9191/realms/sivalabs/protocol/openid-connect/userinfo",
    "end_session_endpoint": "http://localhost:9191/realms/sivalabs/protocol/openid-connect/logout",
    "frontchannel_logout_session_supported": true,
    "frontchannel_logout_supported": true,
    "jwks_uri": "http://localhost:9191/realms/sivalabs/protocol/openid-connect/certs",
    "check_session_iframe": "http://localhost:9191/realms/sivalabs/protocol/openid-connect/login-status-iframe.html",
    "grant_types_supported": [
        "authorization_code",
        "implicit",
        "refresh_token",
        "password",
        "client_credentials",
        "urn:ietf:params:oauth:grant-type:device_code",
        "urn:openid:params:grant-type:ciba"
    ],
    ...,
  "response_types_supported": [
        "code",
        "none",
        "id_token",
        "token",
        "id_token token",
        "code id_token",
        "code token",
        "code id_token token"
    ],
    ...
    ...
}
We will use authorization_endpoint, token_endpoint during the Authorization Code Flow.
Authentication using Authorization Code Flow
In Authorization Code Flow, first we get an authorization_code via Redirect URL on front-channel (browser url) and then use that authorization_code along with client_id and client_secret to get access_token via the back-channel (code on server).
Get Authorization Code
First, we are going to request for authorization_code using the authorization_endpoint as follows:
- Open the following URL in a browser window.
http://localhost:9191/realms/sivalabs/protocol/openid-connect/auth?
  response_type=code
  &client_id=messages-webapp
  &scope=profile
  &state=randomstring
  &redirect_uri=http://localhost:8080/callback
- Then you will be redirected to Keycloak’s Login page.
- Login with the user credentials siva/siva1234.
- Then you will be redirected the Redirect URI which has code as a query parameter.
http://localhost:8080/callback?
  state=randomstring
  &session_state=07aecbd0-dc7e-487e-a1e5-ee36b3fdd5d7
  &code=6e4fb072-df61-4d13-998d-469abf60492b.07aecbd0-dc7e-487e-a1e5-ee36b3fdd5d7.27a26554-da99-417c-a775-bf6559c98f02
The authorization_code is 6e4fb072-df61-4d13-998d-469abf60492b.07aecbd0-dc7e-487e-a1e5-ee36b3fdd5d7.27a26554-da99-417c-a775-bf6559c98f02.
NOTE: The redirect_uri you specified in the request URL should match one of the Client’s Valid redirect URIs configured in the Login settings.
Get AccessToken
Now that we have authorization_code, we can get access_token using token_endpoint as follows:
curl --location 'http://localhost:9191/realms/sivalabs/protocol/openid-connect/token' \
--header 'Content-Type: application/x-www-form-urlencoded' \
--data-urlencode 'grant_type=authorization_code' \
--data-urlencode 'client_id=messages-webapp' \
--data-urlencode 'client_secret=qVcg0foCUNyYbgF0Sg52zeIhLYyOwXpQ' \
--data-urlencode 'code=6e4fb072-df61-4d13-998d-469abf60492b.07aecbd0-dc7e-487e-a1e5-ee36b3fdd5d7.27a26554-da99-417c-a775-bf6559c98f02' \
--data-urlencode 'redirect_uri=http://localhost:8080/callback' \
--data-urlencode 'scope=profile'
This should return a JSON response something like this:
{
    "access_token": "eyJhbGciOiJSUzI1NiIsInR5cCIgOiAiSldUIiwia2lkIiA6ICJMeVVPTDg4LVBGM3BYQzFpN3BIeGdFZTJwaWZJY3RyTXJiNklHOElmRTlVIn0.eyJleHAiOjE2OTU1NDAxODEsImlhdCI6MTY5NTUzOTg4MSwiYXV0aF90aW1lIjoxNjk1NTM5ODQ3LCJqdGkiOiIyYjRmNjNlMC0xNzg2LTRmYzctOTIxNy01ZDEzMjg5MDhhN2QiLCJpc3MiOiJodHRwOi8vbG9jYWxob3N0OjkxOTEvcmVhbG1zL3NpdmFsYWJzIiwiYXVkIjoiYWNjb3VudCIsInN1YiI6ImNhMWEyZjM0LTE2MTQtNDVkZC04NmMxLTVlYWZmZjA4NWQ4YSIsInR5cCI6IkJlYXJlciIsImF6cCI6Im1lc3NhZ2VzLXdlYmFwcCIsInNlc3Npb25fc3RhdGUiOiIwN2FlY2JkMC1kYzdlLTQ4N2UtYTFlNS1lZTM2YjNmZGQ1ZDciLCJhY3IiOiIxIiwiYWxsb3dlZC1vcmlnaW5zIjpbImh0dHA6Ly9sb2NhbGhvc3Q6ODA4MCJdLCJyZWFsbV9hY2Nlc3MiOnsicm9sZXMiOlsiZGVmYXVsdC1yb2xlcy1zaXZhbGFicyIsIm9mZmxpbmVfYWNjZXNzIiwidW1hX2F1dGhvcml6YXRpb24iXX0sInJlc291cmNlX2FjY2VzcyI6eyJhY2NvdW50Ijp7InJvbGVzIjpbIm1hbmFnZS1hY2NvdW50IiwibWFuYWdlLWFjY291bnQtbGlua3MiLCJ2aWV3LXByb2ZpbGUiXX19LCJzY29wZSI6ImVtYWlsIHByb2ZpbGUiLCJzaWQiOiIwN2FlY2JkMC1kYzdlLTQ4N2UtYTFlNS1lZTM2YjNmZGQ1ZDciLCJlbWFpbF92ZXJpZmllZCI6dHJ1ZSwibmFtZSI6IlNpdmEgS2F0YW1yZWRkeSIsInByZWZlcnJlZF91c2VybmFtZSI6InNpdmEiLCJnaXZlbl9uYW1lIjoiU2l2YSIsImZhbWlseV9uYW1lIjoiS2F0YW1yZWRkeSIsImVtYWlsIjoic2l2YUBnbWFpbC5jb20ifQ.W23gLsCkaWMi85BvvgzHhAdAEKMBPP6pzLhHnkKamzfG0Sw6XILPlXagrLSZBgzkaNSgt3ttZ6JLizh_oKuKmZBucAWtsBCo6ZIiPZDUDrEk95sDybhIEJZH-b1LSWMVLa2NXLE_FkEtTE44zCi2B2MxFQzfCuf7RJ5WnnW8XLAD6qbZVF64HT2wYNRiZiuq9MPwKPU-pOAGjGa53ko37EOgc0RjVE14D1--RFlGfLmGc4aGrl6OSElf1X8ya4wyDT8vP9pbWK4Fe-XLI9zOlYdY506TdOtAoe28Pu4GPhL5PrBQ1-2pY30_fN6BVgFk0qyff76yFyNNMFNNm6aA5w",
    "expires_in": 299,
    "refresh_expires_in": 1765,
    "refresh_token": "eyJhbGciOiJIUzI1NiIsInR5cCIgOiAiSldUIiwia2lkIiA6ICI5N2E1NTU3Ni01MThlLTQ1MDItOWQyNi1jNzVmYjZhNGRhZWEifQ.eyJleHAiOjE2OTU1NDE2NDcsImlhdCI6MTY5NTUzOTg4MiwianRpIjoiOTZkYzFhYzYtMWI1ZC00MjA2LWFiM2EtOWQ4MDg2Y2ZmMjc1IiwiaXNzIjoiaHR0cDovL2xvY2FsaG9zdDo5MTkxL3JlYWxtcy9zaXZhbGFicyIsImF1ZCI6Imh0dHA6Ly9sb2NhbGhvc3Q6OTE5MS9yZWFsbXMvc2l2YWxhYnMiLCJzdWIiOiJjYTFhMmYzNC0xNjE0LTQ1ZGQtODZjMS01ZWFmZmYwODVkOGEiLCJ0eXAiOiJSZWZyZXNoIiwiYXpwIjoibWVzc2FnZXMtd2ViYXBwIiwic2Vzc2lvbl9zdGF0ZSI6IjA3YWVjYmQwLWRjN2UtNDg3ZS1hMWU1LWVlMzZiM2ZkZDVkNyIsInNjb3BlIjoiZW1haWwgcHJvZmlsZSIsInNpZCI6IjA3YWVjYmQwLWRjN2UtNDg3ZS1hMWU1LWVlMzZiM2ZkZDVkNyJ9.G5shFoEF1ptXUHM0FommjZ40fF1r61rd0fHU33R1CAc",
    "token_type": "Bearer",
    "not-before-policy": 0,
    "session_state": "07aecbd0-dc7e-487e-a1e5-ee36b3fdd5d7",
    "scope": "email profile"
}
NOTE: The authorization_code is valid only for a short period of time. So, once you get authorization_code then you should quickly invoke the token endpoint. Otherwise, you will get response like this:
{
    "error": "invalid_grant",
    "error_description": "Code not valid"
}
Finally, we got access_token which we can use while accessing a protected resource on a Resource Server.
Authorization Code Flow using Postman
As you can see, getting access_token is a 2-step process and authorization_code might become invalid by the time we invoke token_endpoint.
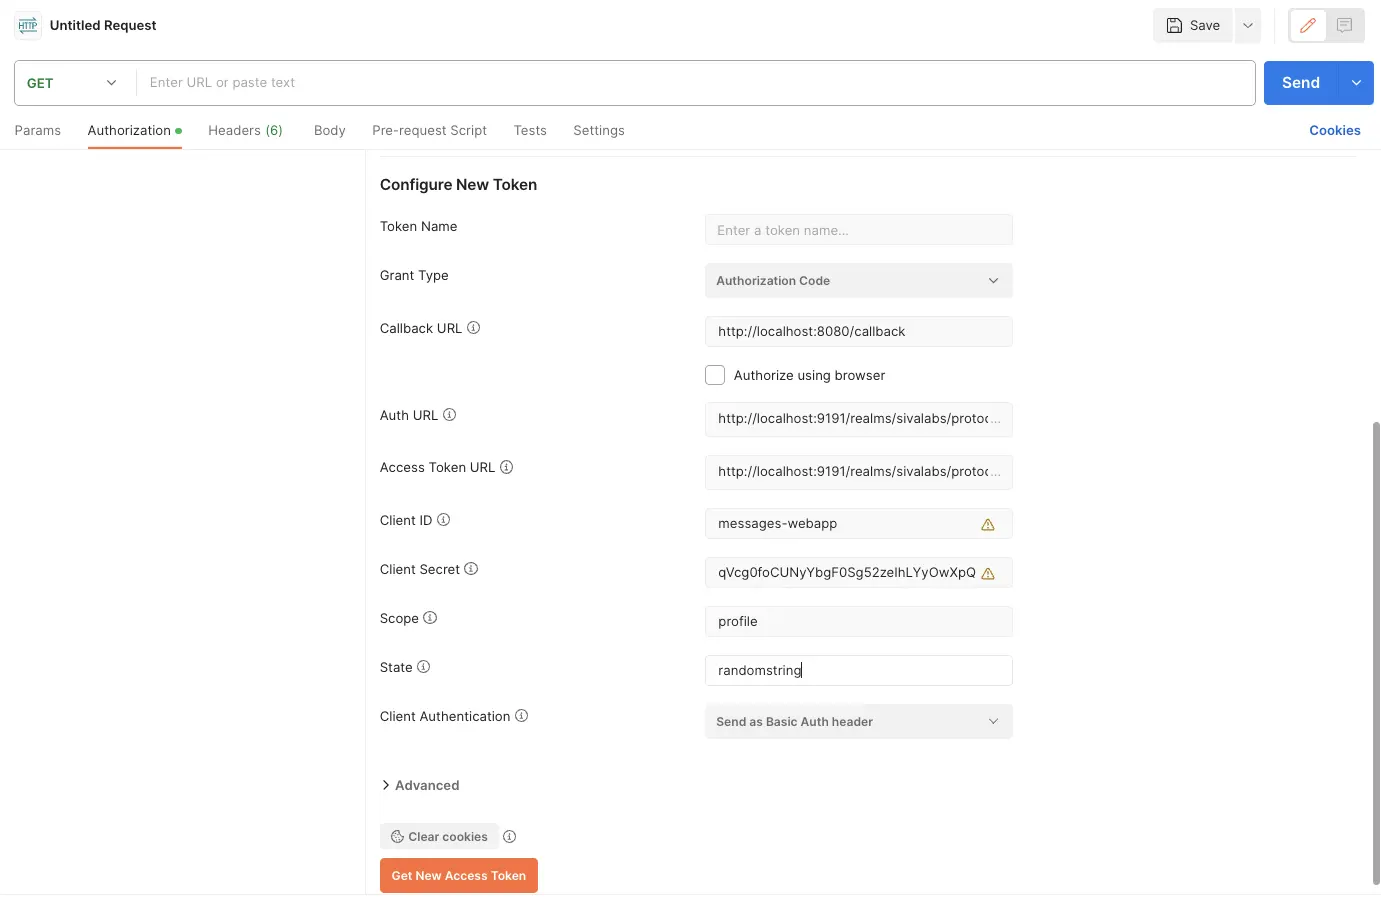
We can use Postman to make it simple as follows:
- Open a New Request tab in Postman
- Go to the Authorization tab and select OAuth 2.0 as Type.
- Under Configure New Token section:
- Grant Type: Authorization Code
- Callback URL: http://localhost:8080/callback
- Auth URL: http://localhost:9191/realms/sivalabs/protocol/openid-connect/auth
- Access Token URL: http://localhost:9191/realms/sivalabs/protocol/openid-connect/token
- Client ID: messages-webapp
- Client Secret: qVcg0foCUNyYbgF0Sg52zeIhLYyOwXpQ
- Scope: profile
- State: randomstring
- Client Authentication: Send as Basic Auth header
- Click on Get New Access Token button
- Postman will open a popup showing Keycloak Login page
- Login with the user credentials siva/siva1234
- Now you should be able to see the response with Token Details

Simple, isn’t it :-)
Getting ID Token
If you have noticed, in the previous request we specified only “profile” as scope, and we got access_token and refresh_token in the response. This is OAuth 2.0 Authorization Code Grant Type.
Now, if you specify “openid profile” as scope then you will also get id_token, which contains more information regarding the authenticated user which is the Resource Owner, in the response. This is OpenID Connect based Authorization Code Flow.
{
    "access_token": "eyJhbGciOiJSUzI1NiIsInR5cCIgOiAiSldUIiwia2lkIiA6ICJMeVVPTDg4LVBGM3BYQzFpN3BIeGdFZTJwaWZJY3RyTXJiNklHOElmRTlVIn0.eyJleHAiOjE2OTU1NDIyMTMsImlhdCI6MTY5NTU0MTkxMywiYXV0aF90aW1lIjoxNjk1NTQxMTg0LCJqdGkiOiIyZDM1NWFjNC0zOTRmLTQ3ZjktOTFiMC05Yjc3MjU0NDBjZDQiLCJpc3MiOiJodHRwOi8vbG9jYWxob3N0OjkxOTEvcmVhbG1zL3NpdmFsYWJzIiwiYXVkIjoiYWNjb3VudCIsInN1YiI6ImNhMWEyZjM0LTE2MTQtNDVkZC04NmMxLTVlYWZmZjA4NWQ4YSIsInR5cCI6IkJlYXJlciIsImF6cCI6Im1lc3NhZ2VzLXdlYmFwcCIsInNlc3Npb25fc3RhdGUiOiJmNDJmMWU5NC0zMmFiLTRjYzktYTRiOS1lMGRmNTIwNWY1NTQiLCJhY3IiOiIwIiwiYWxsb3dlZC1vcmlnaW5zIjpbImh0dHA6Ly9sb2NhbGhvc3Q6ODA4MCJdLCJyZWFsbV9hY2Nlc3MiOnsicm9sZXMiOlsiZGVmYXVsdC1yb2xlcy1zaXZhbGFicyIsIm9mZmxpbmVfYWNjZXNzIiwidW1hX2F1dGhvcml6YXRpb24iXX0sInJlc291cmNlX2FjY2VzcyI6eyJhY2NvdW50Ijp7InJvbGVzIjpbIm1hbmFnZS1hY2NvdW50IiwibWFuYWdlLWFjY291bnQtbGlua3MiLCJ2aWV3LXByb2ZpbGUiXX19LCJzY29wZSI6Im9wZW5pZCBlbWFpbCBwcm9maWxlIiwic2lkIjoiZjQyZjFlOTQtMzJhYi00Y2M5LWE0YjktZTBkZjUyMDVmNTU0IiwiZW1haWxfdmVyaWZpZWQiOnRydWUsIm5hbWUiOiJTaXZhIEthdGFtcmVkZHkiLCJwcmVmZXJyZWRfdXNlcm5hbWUiOiJzaXZhIiwiZ2l2ZW5fbmFtZSI6IlNpdmEiLCJmYW1pbHlfbmFtZSI6IkthdGFtcmVkZHkiLCJlbWFpbCI6InNpdmFAZ21haWwuY29tIn0.IQ52KDoyaGztq1hYqMjZici6eWxPOnLa3RSz7E23Cp1607wVwrCtWwYLAfwewzedrdkjYO9w58qEww-LvsWuzOr85i85JcHL7gQ7kYXS4kRvsKNUs-41wnJUEI6V4-9BduQdSarE43VMUNVS9ZUlNWCsAa7yVKOLdlLEbtM7bWWyGekojye6AQrB9enpKnRGcZaQWRhUZ6k07-d91QeyT2P7VRMit4gjaZmnaSlUKUvKzSYdmRhpB8vcNfggFTeNPgedYQOOwA-vbMWW0LQVElgtvi6eSUTksyFMwaP9iGdI0HyTW7IFi9ddFn3hq43GNahfrckoDeKXtkKQEPOgng",
    "expires_in": 299,
    "refresh_expires_in": 1765,
    "refresh_token": "eyJhbGciOiJIUzI1NiIsInR5cCIgOiAiSldUIiwia2lkIiA6ICI5N2E1NTU3Ni01MThlLTQ1MDItOWQyNi1jNzVmYjZhNGRhZWEifQ.eyJleHAiOjE2OTU1NDM3MTIsImlhdCI6MTY5NTU0MTkxMywianRpIjoiYWQyNWQwN2UtZWY0OS00M2YxLWI1ZWUtOThlYzU2ZmZjYWY0IiwiaXNzIjoiaHR0cDovL2xvY2FsaG9zdDo5MTkxL3JlYWxtcy9zaXZhbGFicyIsImF1ZCI6Imh0dHA6Ly9sb2NhbGhvc3Q6OTE5MS9yZWFsbXMvc2l2YWxhYnMiLCJzdWIiOiJjYTFhMmYzNC0xNjE0LTQ1ZGQtODZjMS01ZWFmZmYwODVkOGEiLCJ0eXAiOiJSZWZyZXNoIiwiYXpwIjoibWVzc2FnZXMtd2ViYXBwIiwic2Vzc2lvbl9zdGF0ZSI6ImY0MmYxZTk0LTMyYWItNGNjOS1hNGI5LWUwZGY1MjA1ZjU1NCIsInNjb3BlIjoib3BlbmlkIGVtYWlsIHByb2ZpbGUiLCJzaWQiOiJmNDJmMWU5NC0zMmFiLTRjYzktYTRiOS1lMGRmNTIwNWY1NTQifQ.xClg0y5senUjiPIa_AzqDlSQ6M5isUBthzgYprfbNN8",
    "id_token": "eyJhbGciOiJSUzI1NiIsInR5cCIgOiAiSldUIiwia2lkIiA6ICJMeVVPTDg4LVBGM3BYQzFpN3BIeGdFZTJwaWZJY3RyTXJiNklHOElmRTlVIn0.eyJleHAiOjE2OTU1NDIyMTMsImlhdCI6MTY5NTU0MTkxMywiYXV0aF90aW1lIjoxNjk1NTQxMTg0LCJqdGkiOiJjYzkyOGVkOC1kMGEzLTQ0YjUtOTEyMS1mOTYwOTc0YzM3ODciLCJpc3MiOiJodHRwOi8vbG9jYWxob3N0OjkxOTEvcmVhbG1zL3NpdmFsYWJzIiwiYXVkIjoibWVzc2FnZXMtd2ViYXBwIiwic3ViIjoiY2ExYTJmMzQtMTYxNC00NWRkLTg2YzEtNWVhZmZmMDg1ZDhhIiwidHlwIjoiSUQiLCJhenAiOiJtZXNzYWdlcy13ZWJhcHAiLCJzZXNzaW9uX3N0YXRlIjoiZjQyZjFlOTQtMzJhYi00Y2M5LWE0YjktZTBkZjUyMDVmNTU0IiwiYXRfaGFzaCI6IkF0R1B6RXdnR3lfejB5TDhWcXc0QmciLCJhY3IiOiIwIiwic2lkIjoiZjQyZjFlOTQtMzJhYi00Y2M5LWE0YjktZTBkZjUyMDVmNTU0IiwiZW1haWxfdmVyaWZpZWQiOnRydWUsIm5hbWUiOiJTaXZhIEthdGFtcmVkZHkiLCJwcmVmZXJyZWRfdXNlcm5hbWUiOiJzaXZhIiwiZ2l2ZW5fbmFtZSI6IlNpdmEiLCJmYW1pbHlfbmFtZSI6IkthdGFtcmVkZHkiLCJlbWFpbCI6InNpdmFAZ21haWwuY29tIn0.f6kIyFDu9kaMBufQWgtta-ZnEDGUNWDa9YVmrsuZDVCWy4roV-dd4Bj41Ncg1bYquHmCTgjk4u2FT7tYxOu4aj5aZS9xGvBDn3zUMOehxY4VxLa-3YSZ-DLsEburxGWFZmrDXbGGP59o7fgLYxsDEsXxuq7LVwzOPYgtNsnleihdADSPNJP9wQ-4_ozWUx1rXEkcJo93S9w6BIiGeKBZBXHMCD8wjxGJPLJh078UumqgypZiEBsmlJRMDQE23k8s2K1Txaru7zDbw1mAu43-lki-sTJgqXnOG8kg3tF5lFK0fLTlG9cB5i8oXZ2zJ3mUbTDx6gZCjfA85Oc_q_vUdw",
    "token_type": "Bearer",
    "not-before-policy": 0,
    "session_state": "f42f1e94-32ab-4cc9-a4b9-e0df5205f554",
    "scope": "openid email profile"
}
Summary
In this part, we have learned how to get access_token and id_token using Authorization Code Flow. We also learned how to use Postman to perform the flow easily.
In the next part, we will explore how OAuth 2.0 Client Credentials Flow works.
Related content
- Spring Boot + jOOQ Tutorial - 5 : Fetching Many-to-Many Relationships
- Spring Boot + jOOQ Tutorial - 4 : Fetching One-to-Many Relationships
- Spring Boot + jOOQ Tutorial - 3 : Fetching One-to-One Relationships
- Spring Boot + jOOQ Tutorial - 2 : Implementing CRUD Operations
- Spring Boot + jOOQ Tutorial - 1 : Getting Started