# Session Management using Spring Session with JDBC DataStore
Author: [Siva](https://www.sivalabs.in/) | Published: 2018-02-07 | Updated: 2026-11-10 | Topics: Spring Boot, springsession | Canonical: https://www.sivalabs.in/blog/session-management-using-spring-session-jdbc-datastore/
In web applications, user session management is very crucial for managing user state. In this article, we are going to learn about the approaches we have been following to manage user sessions in a clustered environment and how we can use Spring Session to implement it in a much simpler and more scalable way.
Typically, in production environments, we will have multiple server nodes with a load balancer in front of them, and all the client traffic will be coming through the load balancer to one of the server nodes. So we need some mechanism to make the user session data available to each client in a clustered environment.
Traditionally, we have been using the following techniques to manage sessions:
1. Single Node Server
2. Multi-Node Server with Load Balancer and Sticky Sessions
3. Multi-Node Server with Load Balancer and Session Replication
4. Multi-Node Server with Load Balancer and Session Data in a Persistent DataStore
Let us briefly look at these approaches.
## 1. Single Node Server
If your application is not a critical service to your business, there won't be too many users concurrently, and some downtime is acceptable, then we can have a Single Node Server deployment as shown below:
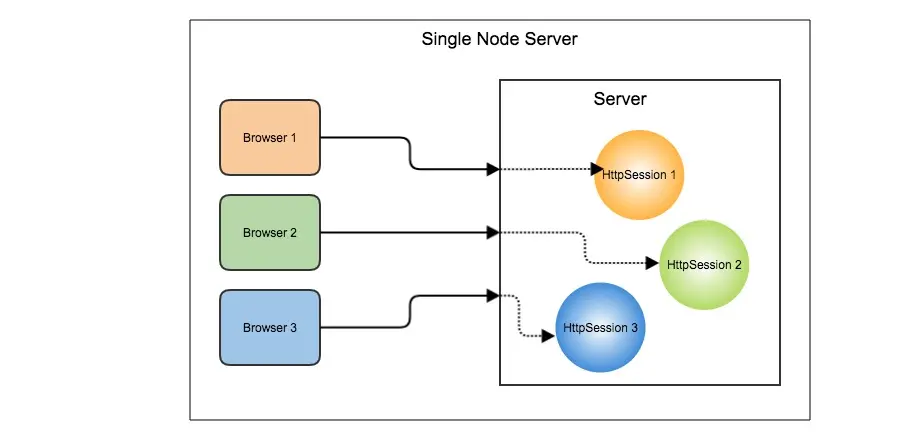
In this model, for each browser client, a session object is created on the server (HttpSession in the case of Java), and a SESSION_ID will be set as a cookie on the browser to identify the session object. But this Single Server Node deployment is not acceptable for most applications because if the server goes down, the service will be down altogether.
## 2. Multi-Node Server with Sticky Sessions
In order to make our application highly available and cater to a larger number of users, we can have multiple server nodes behind a load balancer. In the Sticky Sessions approach, we configure our load balancer to route all the requests from the same client to the same node.
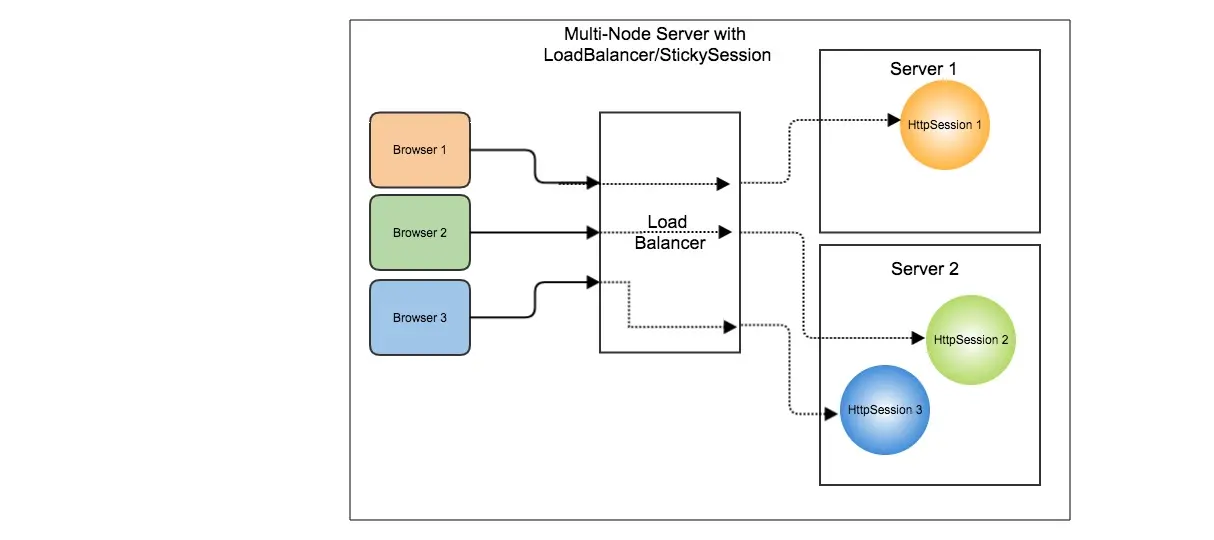
In this model, the user session will be created on any one of the server nodes, and all further requests from that client will be sent to that same node. But the problem with this approach is that if a server node goes down, then all the user sessions on that server are gone.
## 3. Multi-Node Server with Session Replication
In this model, the user session data will be replicated on all the server nodes so that any request can be routed to any server node. Even if one node goes down, the client request can be served by another node.
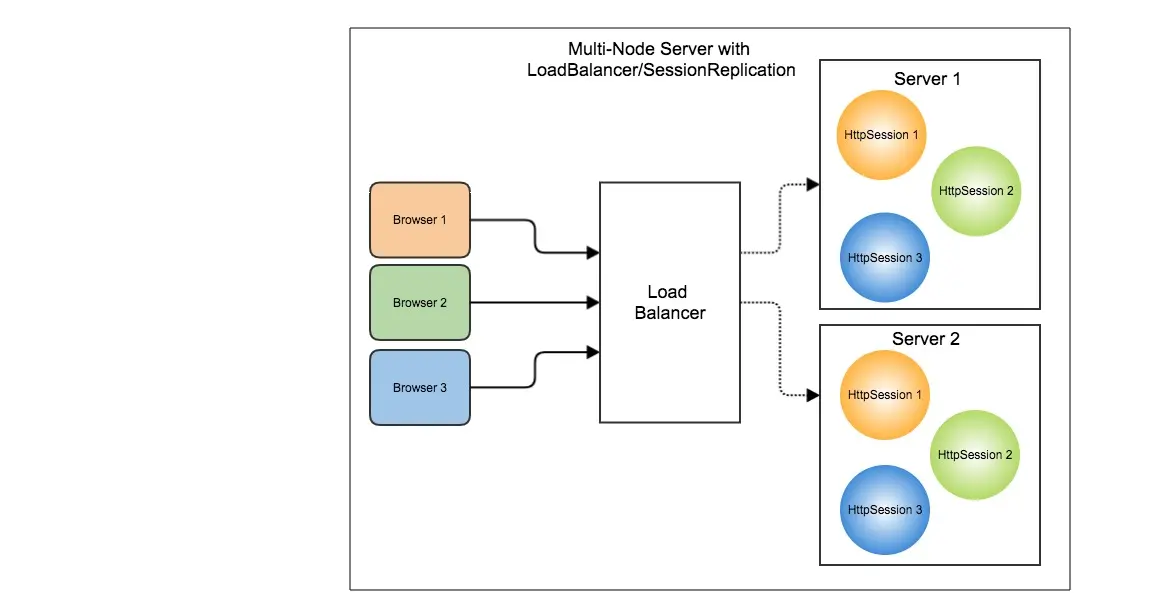
But Session Replication requires better hardware support and involves some server-specific configuration.
## 4. Multi-Node Server with Session Data in a Persistent DataStore
In this model, the user session data will not be held in the server's memory; instead, it will be persisted into a data store and associated with a SESSION_ID.
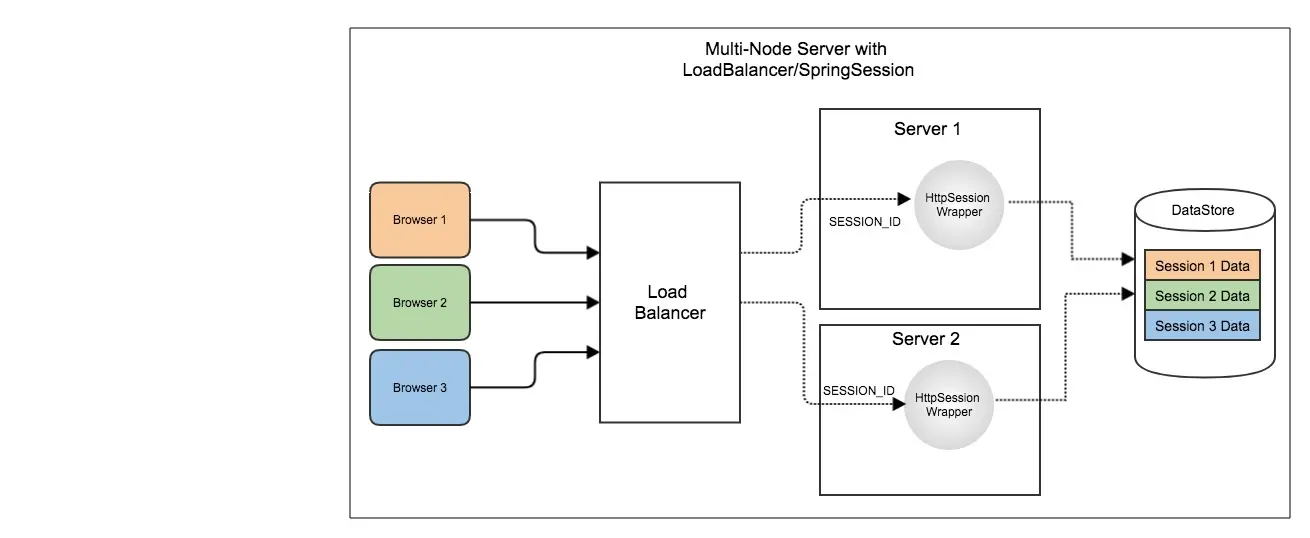
This solution will be server-independent, but we may need to write custom code to transparently store the session data in a persistent datastore whenever a user adds some information to his/her session.
This is where Spring Session comes into the picture.
## Spring Session
[Spring Session](https://projects.spring.io/spring-session/) is an implementation of approach 4, which is storing session data in a persistent datastore.
Spring Session supports multiple datastores like RDBMS, Redis, Hazelcast, MongoDB, etc., to transparently save user session data.
As usual, using Spring Session with Spring Boot is as simple as adding a dependency and configuring a few properties.
Let us see how we can use Spring Session with a JDBC backend store in a Spring Boot application.
> You can find the source code for this article at https://github.com/sivaprasadreddy/spring-session-samples
### Step 1: Create a Spring Boot application
Create a Spring Boot application using the latest version (it is 2.0.0.RC1 as of writing) with **Web, Thymeleaf, JPA, H2, and Session** starters.
By default, the Session starter will add the **org.springframework.session:spring-session-core** dependency.
Let us change it to **spring-session-jdbc** as we are going to use a JDBC backend.
```xml
org.springframework.session
spring-session-jdbc
```
### Step 2: Configure Spring Session properties
We can configure the type of Spring Session backend data store using the **spring.session.store-type** property in `application.properties`.
```properties
spring.session.store-type=jdbc
```
As we are using the H2 In-Memory database, Spring Session creates the following tables required to store session data automatically
from the script **spring-session-jdbc-2.0.1.RELEASE.jar!/org/springframework/session/jdbc/schema-h2.sql**.
```sql
CREATE TABLE SPRING_SESSION (
PRIMARY_ID CHAR(36) NOT NULL,
SESSION_ID CHAR(36) NOT NULL,
CREATION_TIME BIGINT NOT NULL,
LAST_ACCESS_TIME BIGINT NOT NULL,
MAX_INACTIVE_INTERVAL INT NOT NULL,
EXPIRY_TIME BIGINT NOT NULL,
PRINCIPAL_NAME VARCHAR(100),
CONSTRAINT SPRING_SESSION_PK PRIMARY KEY (PRIMARY_ID)
);
CREATE UNIQUE INDEX SPRING_SESSION_IX1 ON SPRING_SESSION (SESSION_ID);
CREATE INDEX SPRING_SESSION_IX2 ON SPRING_SESSION (EXPIRY_TIME);
CREATE INDEX SPRING_SESSION_IX3 ON SPRING_SESSION (PRINCIPAL_NAME);
CREATE TABLE SPRING_SESSION_ATTRIBUTES (
SESSION_PRIMARY_ID CHAR(36) NOT NULL,
ATTRIBUTE_NAME VARCHAR(200) NOT NULL,
ATTRIBUTE_BYTES LONGVARBINARY NOT NULL,
CONSTRAINT SPRING_SESSION_ATTRIBUTES_PK PRIMARY KEY (SESSION_PRIMARY_ID, ATTRIBUTE_NAME),
CONSTRAINT SPRING_SESSION_ATTRIBUTES_FK FOREIGN KEY (SESSION_PRIMARY_ID) REFERENCES SPRING_SESSION(PRIMARY_ID) ON DELETE CASCADE
);
CREATE INDEX SPRING_SESSION_ATTRIBUTES_IX1 ON SPRING_SESSION_ATTRIBUTES (SESSION_PRIMARY_ID);
```
But if we are going to use another RDBMS like MySQL, we can configure it as follows:
Add the MySQL Maven dependency.
```xml
mysql
mysql-connector-java
```
Configure datasource properties for MySQL:
```properties
spring.datasource.driver-class-name=com.mysql.jdbc.Driver
spring.datasource.url=jdbc:mysql://localhost:3306/demo
spring.datasource.username=root
spring.datasource.password=admin
```
With this property, Spring Session will try to create tables using the script
**classpath:org/springframework/session/jdbc/schema-@@platform@@.sql**; so in our case, it will use **schema-mysql.sql**.
### Step 3: Add data to HttpSession
Now create a simple form in `src/main/resources/templates/index.html`.
```xml
Spring Session + JDBC Demo
```
Let us implement a Controller to add messages to the HttpSession and display them.
```java
import org.springframework.stereotype.Controller;
import org.springframework.ui.Model;
import org.springframework.web.bind.annotation.GetMapping;
import org.springframework.web.bind.annotation.PostMapping;
import org.springframework.web.bind.annotation.RequestParam;
import javax.servlet.http.HttpServletRequest;
import javax.servlet.http.HttpSession;
import java.util.*;
@Controller
public class MessagesController
{
@GetMapping("/")
public String index(Model model, HttpSession session) {
List msgs = (List) session.getAttribute("MY_MESSAGES");
if(msgs == null) {
msgs = new ArrayList<>();
}
model.addAttribute("messages", msgs);
return "index";
}
@PostMapping("/messages")
public String saveMessage(@RequestParam("msg") String msg, HttpServletRequest request)
{
List msgs = (List) request.getSession().getAttribute("MY_MESSAGES");
if(msgs == null) {
msgs = new ArrayList<>();
request.getSession().setAttribute("MY_MESSAGES", msgs);
}
msgs.add(msg);
return "redirect:/";
}
}
```
Now you can start the application, add some messages to the HttpSession, and you can see the rows in the
**SPRING_SESSION** and **SPRING_SESSION_ATTRIBUTES** tables.
By default, Spring Session converts the objects that we are trying to add to the HttpSession into a **ByteArray** and stores it in the table.
## Spring Session with Spring Security
Spring Session seamlessly integrates with Spring Security because of Spring Boot's auto-configuration.
Let us add Spring Security to our application.
```xml
org.springframework.boot
spring-boot-starter-security
```
Add default user credentials in `application.properties` as follows:
```properties
spring.security.user.name=admin
spring.security.user.password=secret
```
Now, if you try to access http://localhost:8080/, you will be redirected to an auto-generated Login page.
Once you log in and see the data in the **SPRING_SESSION** table, you can see that the login username is stored in the **PRINCIPAL_NAME** column.
### How does Spring Session work?
Spring Session provides implementations for **HttpServletRequest** and **HttpSession**, which are **SessionRepositoryRequestWrapper**
and **HttpSessionWrapper**. Spring Session provides **SessionRepositoryFilter** to intercept all requests and wrap the **HttpServletRequest**
in **SessionRepositoryRequestWrapper**.
In **SessionRepositoryRequestWrapper.getSession(boolean)** is overridden to return an **HttpSessionWrapper** object instead of the default server implementation of HttpSession.
The **HttpSessionWrapper** uses **SessionRepository** to persist session information in a datastore.
The `SessionRepository` interface has various methods to manage sessions.
```java
public interface SessionRepository
{
S createSession();
void save(S session);
S findById(String id);
void deleteById(String id);
}
```
This `SessionRepository` interface is implemented by various classes based on the type of backend we are using.
In our case, we are using **JdbcOperationsSessionRepository**, provided by **spring-session-jdbc**.
## Conclusion
As you might have already observed, we can manage user sessions effectively by using Spring Session with very minimal configuration
because of Spring Boot's auto-configuration. If for any reason we want to change the backend from JDBC to Redis or Hazelcast, etc.,
it is only a simple configuration change, as we are not directly depending on any Spring Session classes.
> You can find the source code for this article at https://github.com/sivaprasadreddy/spring-session-samples